Contributing
Introduction
This guide is for anyone who wants to contribute to the Maester project. Whether you want to contribute to the code, documentation, or just have an idea for a new feature, we welcome your input.
Follow the guide below to set up Maester for development on your local machine, make changes, and submit a pull request.
Maester PowerShell module dev guide
Simple debugging
- Set a breakpoint anywhere in the code and hit F5
- The launch.json has been configured to re-load the module
Manual editing
- Source files live in
./powershell(module functions) and./tests(bundled test suites). Never edit files in./module— it is generated build output. - For quick iteration, load the PowerShell module directly from source. This needs to be done anytime you make changes to the code in
./powershell.Import-Module ./powershell/Maester.psd1 -Force
- Run Maester
Invoke-Maester
Building the module
The publishable Maester module is produced by a build script that consolidates the source files into an optimized module for faster import:
- Run
./build/Build-MaesterModule.ps1to produce the publishable module in./module. - Test your changes against the built output by importing it:
Import-Module ./module/Maester.psd1 -Force. ./moduleis a build artifact: it is ignored by git and never committed to source control. Built modules are attached to GitHub Releases and published to the PowerShell Gallery from CI.- The
FunctionsToExportlist in the builtMaester.psd1is auto-generated at build time from the public source files. Do not edit the built manifest manually. - The bundled test files in
./module/maester-testsare copied at build time from./tests. Do not edit build output manually.
Code style
- Use the One True Brace Style (OTBS): the opening brace goes on the same line as the statement.
- Use Pascal Case for all variable and parameter names.
- Use 4-space indentation. No tabs.
- Save all
.ps1and.psm1files as UTF-8 with BOM (utf8BOM). - Use approved PowerShell verbs only. Run
Get-Verbfor the authoritative list. - Avoid trailing whitespace. End every file with one blank line (a single trailing newline).
- Place comment-based help inside the function body (immediately after the opening brace), not above the
functionkeyword.
File organization
- Public (exported) functions go in
./powershell/public. One function per file, and the filename must match the function name exactly. - Internal helper functions go in
./powershell/internal. These are never exported. - Pester test suite files go in
./tests/<SuiteName>.
Pester Tests
- QA tests for the Maester module framework itself are at
./powershell/tests. These are distinct from the bundled security test suites in./tests. - When making changes to the module you can run the QA tests locally by running
./powershell/tests/pester.ps1 - The PSScriptAnalyzer, PSFramework and PSModuleDevelopment modules are required to run the tests, install them with
Install-Module PSFramework, PSModuleDevelopment, PSScriptAnalyzer - The tests are run automatically on PRs and commits to the main branch and will fail if the tests do not pass
Contributing new tests and updating existing tests
Test folder convention
We have the following test folders:
/CISA- CISA tests/Custom- Folder for user's to add tests (do not add any tests to this folder)./EIDSCA- EIDSCA tests/Maester- Maester tests/Entra- Maester's Entra tests
Checklist for writing good tests
When contributing tests, please ensure the following:
Before writing the test
- Check if your new idea is not already covered by an existing test (you can also jump on the Maester Discord to discuss)
- Reserve a unique id for your test (e.g.
Invoke-Maester -Tag MS.AAD.5.1). See #️⃣ Pick next Maester test sequence number on how to reserve a unique id for your new test. - Decide if the test should go into an existing .Tests.ps1
Writing the test
- Decide in which folder the test should live. See Test folder convention above.
- Decide if you are going to add the test to an existing .Tests.ps1 file or create a new one. E.g. If it's CA related you can add to the existing CA tests file. Don't stress over this, it's easy to move it around at any time.
- Follow the guide at Writing custom tests - Advanced Guide to write your test.
- The code inside the cmdlet is wrapped inside a try..catch (see advanced guide above).
- Add the
FunctionsToExportcmdlet to the .psd1 file - The related cmdlet for the test has a .md file to explain the test in detail and provides all the context required for the user to resolve the issue, including deep links to the admin portal page to resolve the issue. This will be shown to the user when they view the test report. The file should include:
- Link to the admin portal blade where the setting can be configured
- If there are multiple objects (e.g. list of CA policies, Users, etc) then use the
GraphObjectsandGraphObjectTypeparameters in Add-MtTestResultDetail. These include deep links to the admin portal. If the object type you wish is not available you can add it to Get-GraphObjectMarkdown.ps1. Feel free to ask on Discord if you need help with this. - If the test is about a specific setting the message should link to the page where the setting can be configured. The .md file should also include steps to configure the setting as well as a link to the admin portal. For a good example of a well written error page see Test-MtCisaWeakFactor.ps1. Another good example is Test-MtCisaAppUserConsent.ps1 and the related Test-MtCisaAppAdminConsent.md.
When in doubt always check the existing tests for the conventions used, feel free to discuss on Discord or GitHub Issues.
Before creating the Pull Request
Test your code
- We run a bunch of pester tests on your code when a PR is raised and will block merge until the issues are addressed.
- Before you submit the PR, run the tests locally by running
/powershell/tests/pester.ps1 - Fix any issues that are reported. If you need help see the
Common Pester test failures and how to fixsection below. Reach out on Discord if you need help. - The PSScriptAnalyzer, PSFramework and PSModuleDevelopment modules are required to run the tests, install them with
Install-Module PSFramework, PSModuleDevelopment, PSScriptAnalyzer - If a test is not applicable (e.g. it says not to use plural but the product name is AzureDevOps then you can add a
SuppressMessageAttributetag (see Invoke-Maester.ps1 which has suppression tags at the beginning of the function).
Updating EIDSCA tests and documentation
The EIDSCA tests and documentation are maintained in the EIDSCA repository → EidscaConfig.json file.
The /build/eidsca/Update-EidscaTests.ps1 script is used to generate the EIDSCA commands in the Maester module along with the EIDSCA tests and documentation.
The script is currently run manually and is not automated as part of the build process as we need to verify the changes before they are committed.
The illustration below shows the workflow for integrating EIDSCA tests and documentation into Maester.
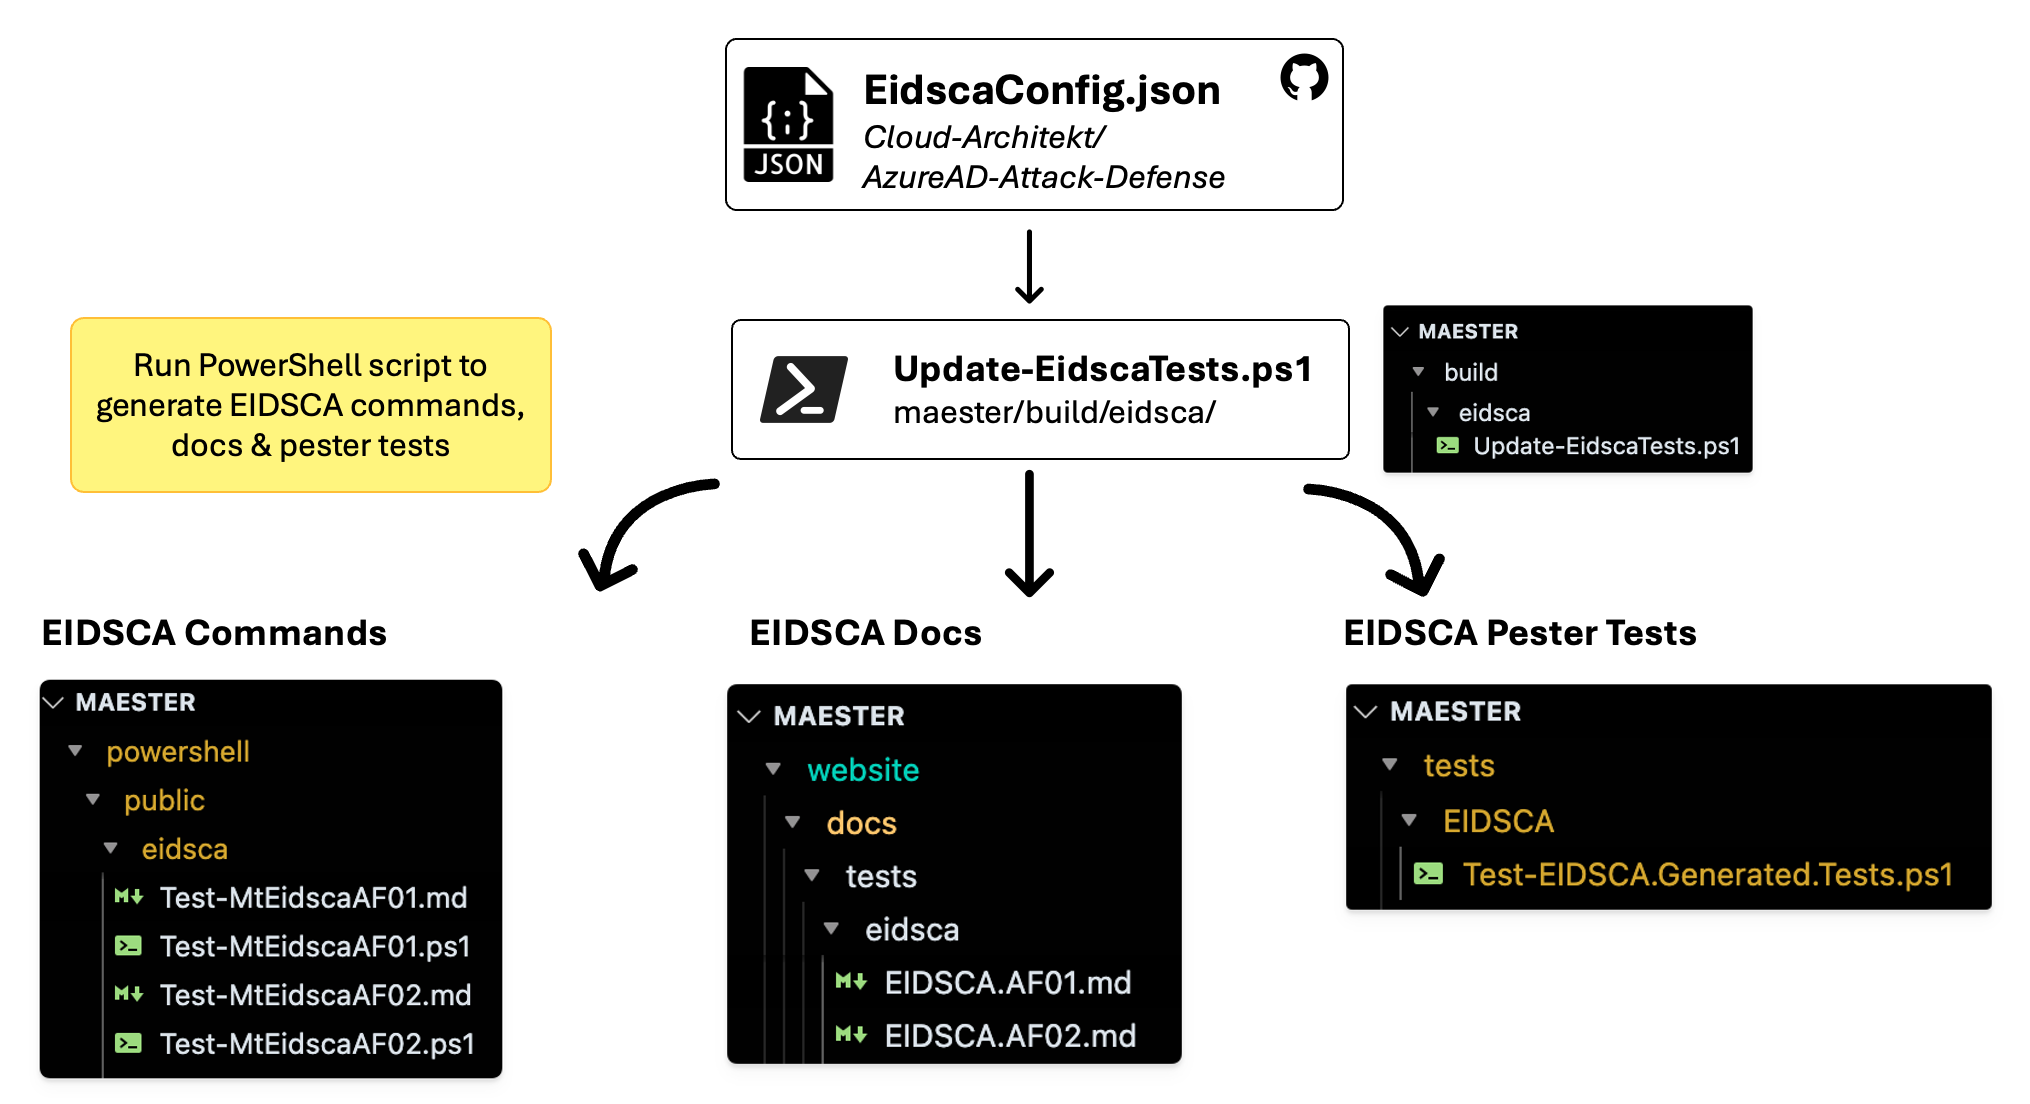
When generating the EIDSCA commands and tests, manual verification should be performed to ensure the EIDSCA tests are being run correctly and the results are accurate.
Common Pester test failures and how to fix
PSUseBOMForUnicodeEncodedFile
The quick fix for this is to run this script. Make sure you give the right path to the affected file.
$affectedFilePath = '/Users/merill/GitHub/maester/powershell/public/maester/entra/Test-MtTenantCreationRestricted.ps1'
$content = Get-Content $affectedFilePath -Raw; $content | Out-File $affectedFilePath -Encoding UTF8BOM
Contributing to Maester docs and blog posts
Simple edits can be made in the GitHub UI by selecting the Edit this page link at the bottom of each page or you can browse to the docs folder on GitHub.
For more complex changes, you can fork the repository and submit a pull request.
The docs/commands folder is auto-generated based on the comments in the PowerShell cmdlets. If you want to update the documentation for a command, you will need to update the comment-based help in the .ps1 file for the command.
Running documentation locally
The Maester.dev website is built using Docusaurus.
Follow this guide if you want to run the documentation locally and view changes in real-time.
Pre-requisites
Node.js version 24.0 or above (which can be checked by running node -v). When installing Node.js, you are recommended to check all checkboxes related to dependencies.
Installation
When running the documentation for the first time, you will need to install the dependencies. This can be done by running the following command in ./website folder.
npm install
Starting the site
While in the ./website folder, run the following command to start the site locally. This will start a local server and open the site in your default browser to http://localhost:3000/
npm start
Editing content
You will now be able to edit add and edit markdown files in the ./website/docs folder and see the changes in real-time in your browser.
- Read the markdown documentation for more information on some of the custom markdown features available.
- You can search for icons at Iconify and include them in the markdown. See the Daily Automation page for examples.
- The
Command Referencesection is auto-generated. To update the documentation for this, the .ps1 file for the command needs to be updated with comment-based documentation.
Site versioning
There are two versions of the Maester website:
- Production - This is the live version of the site that is updated whenever a new version of the Maester module is released.
- Preview - This is the version of the site that is updated with every commit to the main branch. This allows you to see changes before they are published to production.
| Environment | URL | Branch | Update Trigger |
|---|---|---|---|
| Production | https://maester.dev | website-prod | New Maester module release |
| Preview | https://preview.maester.dev | main | Every commit to the main branch |
When a new version of the Maester module is released, the documentation will be updated to reflect the changes in that version.
Urgent changes to blog posts and documentation
If a blog post or doc change is urgent and cannot wait till the next release, create a PR against the website-prod branch directly.
Once that is reviewed and merged, you will need to create another PR to bring the changes into the main branch.
This is because the website-prod branch is deleted and recreated with every Maester module release to ensure it is always in sync with the released version of the module.
This process ensures any interim changes to the production site are intentional.